Friday, May 22, 2015

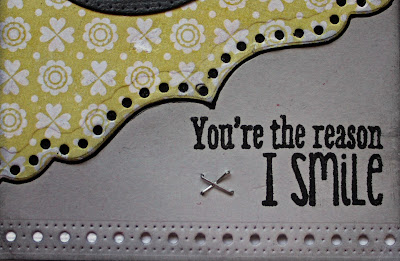
Reason I Smile Tag


Hello and Welcome!

I decide to create a tag this week instead of a card. I hope you like it!


I used the Pierced Stacker #3 to cut the coloured stamped image. I also cut the matte using one size larger stacker die from dark gray cardstock.

The smallest Pierced Banners was cut from light gray cardstock and stamped with my sentiment. I attached the banner to the top right corner with a tiny stapler and trimmed.


The bottom portion was cut using border dies. The Curved Border was cut on an angle, using 2 dies from the set of 4, then highlighted with a black pen. I used one die from the Deutschland Border Set on the very bottom and also used tiny staples to mimic the design. 


Dies used:
I hope you will play along in our weekly Cheery Lynn Designs Challenge 185 - Make It ManlyYou could win a $20 shopping spree at the online Cheery Lynn Design Store.

Thanks for joining me today!

Take care,
Live, Laugh & Create 

Friday, May 15, 2015

Birthday Card

Hello Crafters!

Today's card was inspired and started by a white piece of card stock that I sprayed with a variety of glimmer mists in pewter, sand, blue, turquoise and old gold.


As you can see by the photo above, I cut a circle out of the sprayed cardstock using a stacker die from the Circle Classic - Silver set. I used the New Release Fleur De Lis Doily die to die cut the center of the circle and backed with black cardstock. I then trimmed the center out of the Clock (Steampunk Series) die cut and adhered it to the top of the circle.

I used one banners from both the new and previous release sets and the second smallest die from the Pierced Stacker #2 set for my Birthday sentiment. In the background, I created the layered base with black cardstock and pattern paper plus I layered the Fiona’s Magic Mirror die which was cut from the sprayed cardstock.


Dies used:

Fleur De Lis Doily (Set of 2) - DL304


I hope you will play along in our weekly Cheery Lynn Designs Challenge 184 - Roses. You could win a $20 shopping spree at the online Cheery Lynn Design Store.

Thanks for joining me today!

Take care,
Live, Laugh & Create 

Friday, May 8, 2015

Grow Old with Me!


Hello!

Todays card was created to highlight the lovely new die set called Dutch Daisy Oval Doily from last months New Release.

I have used a lot of layers on the card base, which are so easy to create with the Cheery Lynn A2 frame sets. Pick your paper, cut and stack! So simple for a great look!


As you can see, my flowers and sentiment are placed on top of the Dutch Daisy Oval Doily die. This die comes as a set of 2 dies. You can use them separately, together, or mix and match this other sets. 

I wanted to show you this set with some dimension so I backed the center in red cardstock after I die cut it and trimmed around the outside. I used pop dots to raise and create depth. 

I have also trimmed off the edges of the Royal Scandinavian Tag 2 die for my embossed sentiment. I tucked it into my flower arrangement and added rhinestones for sparkle.


Dies used:

Royal Scandinavian Tag 2 - B546


I hope you will play along in our weekly Cheery Lynn Designs Challenge 183 - Lots of Layers. You could win a $20 shopping spree at the online Cheery Lynn Design Store.

Thanks for joining me today!

Take care,
Live, Laugh & Create 

Friday, May 1, 2015

Dog Lover Card


Happy Friday May 1st to you!

I have created my card using the new Pet Pack (Set of 11) and Meow! & Woof! (Set of 2) from the Cheery Lynn Designs New Release last month.


I also used two stackers from the Pierced Stacker #1 (Set of 6). It think it resembles the shape of a fire hydrant and that always makes me think of our K9 friends!


I wanted to incorporate a Cheery Lynn Flower because......well......I am addicted! So I create the Judy's Blooms flower by cutting the large die out twice. Layered them together and placed it on top of some looped twine and foliage.


I then added a paw from the new release to the center. To get the embossed effect, use a rubber mat under your die. I then added a little glitter glue to the cut out area.


I cut the WOOF sentiment out of cardstock and added brown glitter glue on top. I also glittered the bone in the top left corner and the paw print on the heart page tab. The paw print on the page tab is the negative from the embossed paw print on the flower. 

Tip: when trying to recreate the paw print with the five small cutouts, lay the "embossed outline" paw print down where you want the print to be and only glue the small pieces in the "holes" and then lift the outline away.

Dies used:

Meow! & Woof! (Set of 2) - B560


I hope you will play along in our weekly Cheery Lynn Designs Challenge 182 - Anything GoesYou could win a $20 shopping spree at the online Cheery Lynn Design Store.

Thanks for joining me today!

Take care,
Live, Laugh & Create