Friday, December 26, 2014

Vintage Holiday Card


Hello

I hope everyone is having a Festive Holiday! Spending time with loved ones and making wonfderful memories!

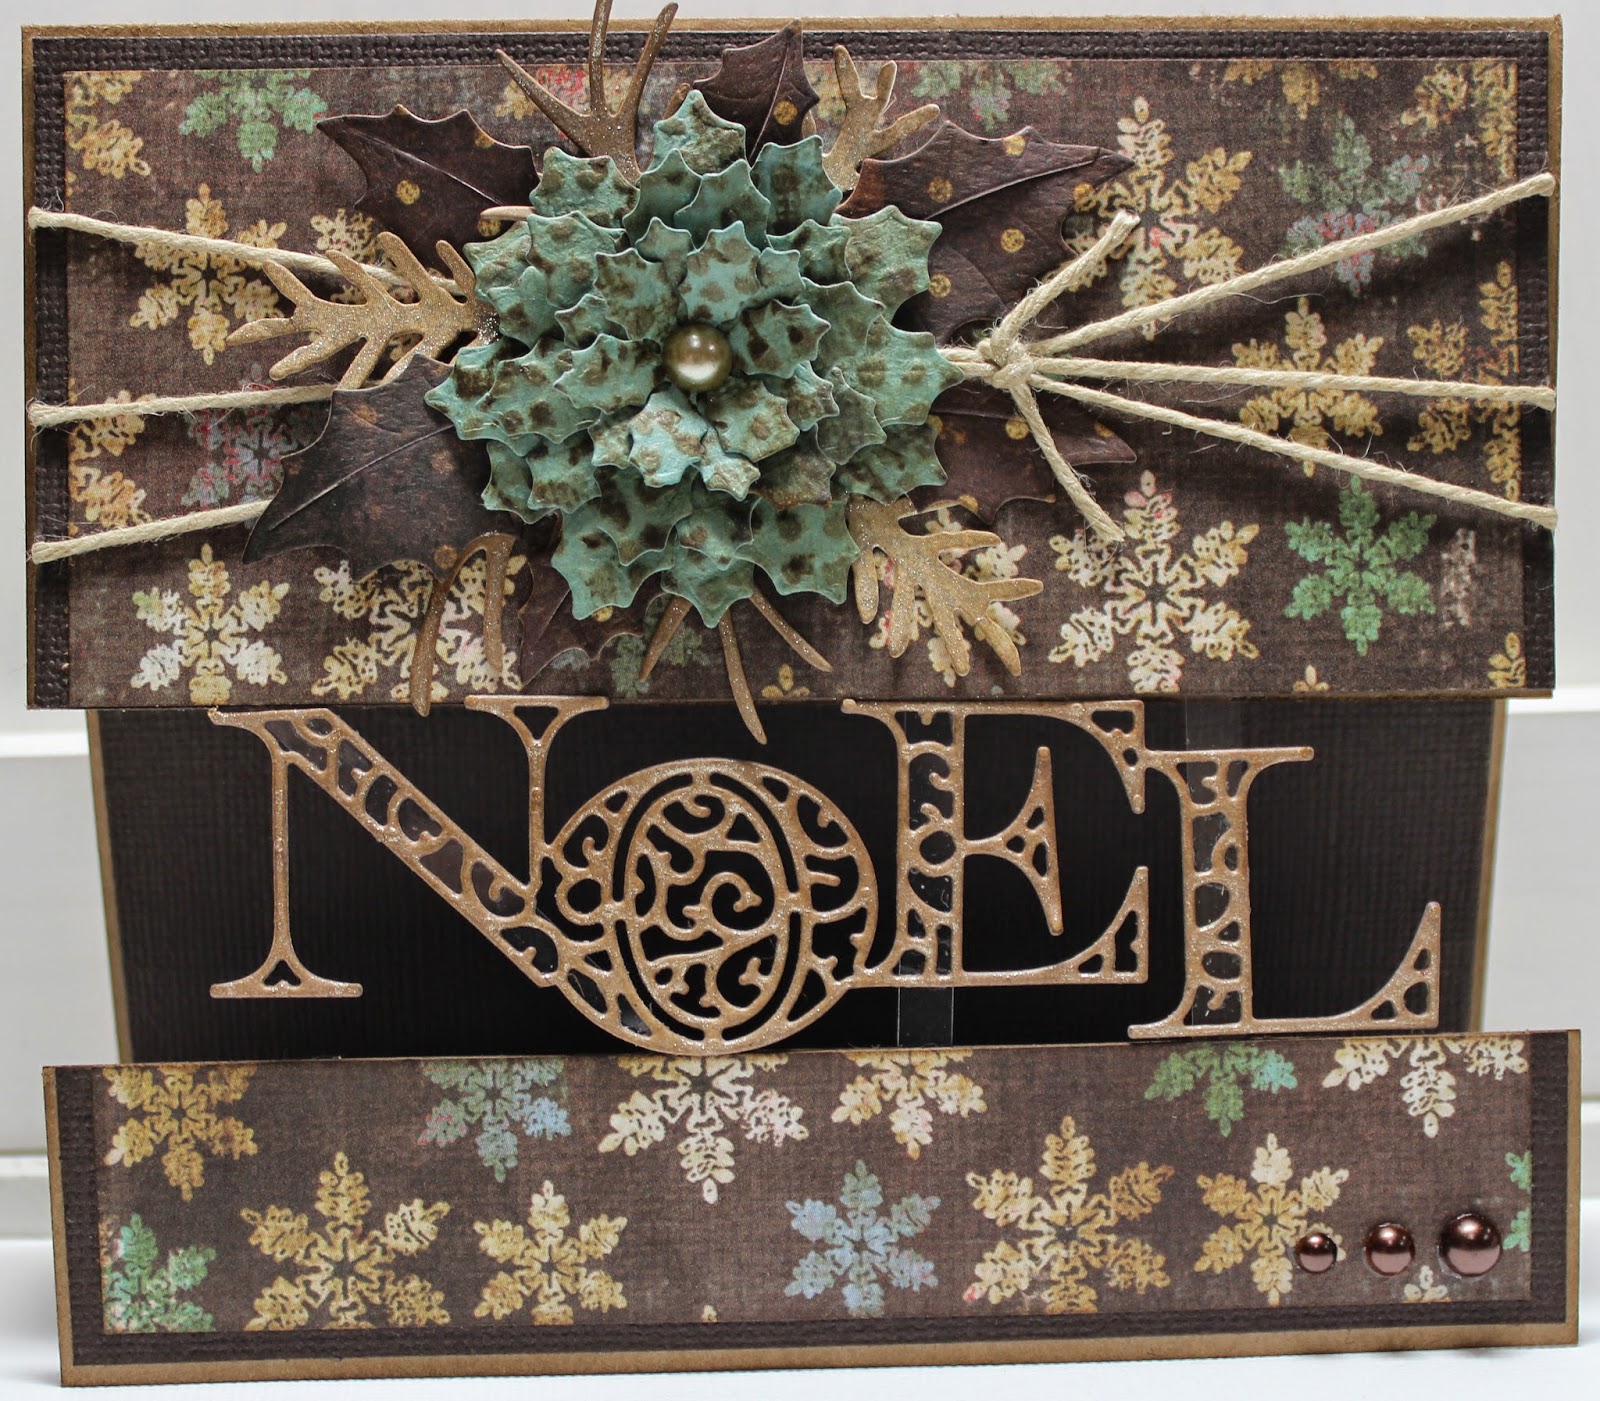
Today on the Cheery Lynn Blog, I am sharing a Vintage Holiday Card.

I created this card using pattern paper, a rich burgundy cardstock and three tones of green. I distressed the edge of the burgundy base and embossed the burgundy Sentiment Tag 2 with the Poinsettia embossing plate.


I second generation stamped a Script Stamp in brown ink to the top cream layer of the Sentiment Tag 2. *Second Generation stamping is when you ink your stamp and stamp off on scratch paper and then stamp. Leaving a lighter image in the true ink colour.

I adhered the Joy to the World sentiment which fits wonderfully!


I then wanted to create a wreath. I used the Joy to the World Wreath but wanted thicker boughs. I went to my die cut machine to cut another Joy to the World Wreath and saw the negative pieces that are removed from the Florence Filigree Doily die!


Perfect! No waste! I tucked them behind the Joy to the World Wreath and added the festive Holly Corner.

Dies used:

Thanks for joining me today!

Take care,

Corina Finley
Live, Laugh & Create!

Friday, December 19, 2014

Joy to the World Card


Hello Everyone!

Today I am sharing another Festive Card Creation. This week I took my inspiration from decorating our tree! 


I cut the ornament with angel wing and the Joy to the World sentiment both out of cream card stock. I embossed Joy to the World and the top of the ornament with Gold embossing powder and the bottom of the ornament with a mixture of clear and gold embossing powder.


I layered the pine branches to create a branch effect and added the Cutie die to the top to create a clean line. I popped the ornament up with foam adhesive and layered Joy to the World to the Sentiment Tag.

Dies used:

Ornate Ornament w/Angel Wing - B478


I hope you will play along in our weekly Cheery Lynn Designs Challenge 163 - Sparkle and Shine. You could win a $20 shopping spree at the online Cheery Lynn Design Store

Thanks for joining me today!

Take care,

Corina Finley
Live, Laugh & Create!

Friday, December 12, 2014

Season's Greetings Card


Hello,

As promised, my card was inspired by the stencil from last weeks card post. As you can see from the top of the picture below.


I thought the stencil with the leftover texture paste on it was too interesting to throw away. The affect looked 'Frosty' and got my creativity rolling!


Here is an up close look at the stencil. Adorned with a few clear rhinestones to highlight each snowflake.

I also used the Snowflake Doily with angel wing. I love layering the Snowflake Doily with one of the Snowflowers as a center. It think it gives the card depth and interest. 


To finish my card, I added the Horizon banners die, Add a Flourish die and my embossed sentiment.

Dies used:

Snowflake Doily w/Angel Wing - DL279


Snowflowers Set One - DL225


hope you will play along in our weekly Challenge 162 - Red and Green over on the Cheery Lynn Design blog. You could win a $20 shopping spree at the online Cheery Lynn Design Store

Thanks for joining me today!

Take care,
Live, Laugh & Create!

Friday, December 5, 2014

Winter is Better Card


 Hello Everyone!

I'm here with you today to share a Winter themed card. I will show you how I added texture/pattern to my card, with the snowflake border die to create a stencil and texture paste.

First I die cut the Snowflake Mesh Border out of thick/heavy card stock.
  

Then apply 2 Way Glue (this glue will dry tacky) which will allow the border to be removable.


Then place your stencil on to your card stock and apply the texture paste.


Lift up the stencil and place it down on the other side of card stock to use it again.


I love how it turned out! Cheery Lynn dies work so well for this technique because they are so detailed. 

Also the Stencil that is left looks interesting with the texture paste on it - frosty! I will have to create a card using it for next week!


Here is a close up of the texture card stock after I layered a few snowflake dies and my sentiment. I tied a piece of white seam binding across the center to hide the gap in the middle. I used the 

Dancing Snow Flurries snowflake, one snowflake from set #1 & #2 of Snowflowers, and a few of the small snowflake to create my blizzard! I finished my card off by adding a little Bling to the snowflakes!


Die used:

Dancing Snow Flurries - B486


I hope you will play along in our weekly Cheery Lynn Designs Challenge 161 - 'Tis the Season. You could win a $20 shopping spree at the online Cheery Lynn Design Store

Thanks for joining me today!

Take care,
Corina Finley
Live, Laugh & Create!

Friday, November 28, 2014

Noel Card


Hello! 

I have seen this style of card before with assorted word die cuts. When I saw the decorative Noel die from Cheery Lynn Designs, I knew I had to give this "Floating Word" card design a try!

I made the base of the card from Kraft card stock. I then matted with a layer of dark brown card stock and snowflake decorative paper. I cut the Noel die out of Kraft and measured the die cut vertically (from the top of the N to the bottom of the O). That measurement is the complete section that you will remove from the front of the card (see above picture for visual).


As you can see from the above picture: I cut three strips of medium weight acetate to give the die cut strength but also to attach the three sections together. The acetate runs diagonally behind the N and vertically behind the E and L. The acetate is sandwiched between the Kraft and dark brown card stock.


I created my Poinsettia using the Poinsettia Strip die. I inked and embossed the petals with the Burlap Embossing Plate. I then inked the top of each petal with brown ink to highlight the embossed impression.


Dies Used:
Poinsettia Strip - B324

Holly Leaves - B183


I hope you will play along in our weekly Cheery Lynn Designs Challenge 160 - Non-traditional Christmas Colors. You could win a $20 shopping spree at the online Cheery Lynn Design Store

Thanks for joining me today!

Take care,
Corina Finley

Live, Laugh & Create!

Friday, November 21, 2014

Holly Christmas Card


Hello! 
I wanted to share my Christmas Card and also a technique that I use when I have pattern paper or an image that does not fit the size/die shape that I want to work with! 


I wanted to use the piece of pattern paper that you see in the picture above. I selected 2 of the 3 dies from the Madrid Flourishes Rectangle Boutique Stackers Frame set and card stock to match.


I die cut one medium and two of the small Madrid Flourishes Rectangle Boutique Stackers Frame. I set the medium Kraft die cut aside.


I overlapped the 2 small Madrid Flourishes Rectangle Frames to the size of my image. I marked with a pencil and then used a Craft Knife and a ruler to trim away excess/overlapped card stock.


I used a piece of the excess scrap card stock to adhere both beside each other. I did allow the very outside border to stay overlapped. It allowed me to glue them to each other and stay stable. 


Perfect sized border - it is hard to see that it started off as 2! I die cut the Christmas sentiment and embossed with vintage copper embossing powder. I finished the card off by creating Holly which I used rhinestone for berries. 


Dies used:

Holly Leaves - B183


I hope you will play along in our weekly Cheery Lynn Designs Challenge 159 - Tag You're It. You could win a $20 shopping spree at the online Cheery Lynn Design store.

Thanks for joining me today!

Take care,

Live, Laugh & Create!

Friday, November 14, 2014

Merry Card


Hello, 

I am sharing my first Christmas Card of the season with you all! I absolutely love traditional Holiday colours, the golds, silvers, reds and greens! 

I used three of the Scalloped Coved Rectangle stacker dies to create the base of the card. Each die was larger than the paper layer that I cut. I placed the die so that only the right side was touching the paper - so that only the right side cut. I did this on each layer. 


I cut my Felicity Doily w/ Angel Wing and cut it in half and adhered it to the left side of my card on top of my base.

I created depth and interest by layering all the foliage/greenery under my Poinsettia. Using various colours of green cardstock to distinguish each layer.


I used only Merry from the Merry Christmas w/Tree Sentiment die. I used red glitter glue on the die cut to make it shine!

Dies Used:
You could win a $20 shopping spree at the online Cheery Lynn Designs store

Thanks for joining me today!

Take care,

Live, Laugh & Create!

Friday, November 7, 2014

Get Well Soon Card


Hello Hello!!

It is November!! Wow, how time has flown by!

Here in British Columbia, Canada, we have a lot of rain during Fall. Then the rain turns into snow - it has snowed twice already - very lightly but has not stayed!

My card palette was inspired by the weather. With a little 'bling' shine for the few rays of sun that peek through now and again!


I used the Florence Filigree Doily from the Octobers release to draw your eye into the center. The New Release Doily dies are really versatile and once you try them - you will be hooked! 


Dies Used:

Tags 4 - B263


I hope you will play along in our weekly Cheery Lynn Designs Challenge 157 - Give Thanks
You could win a $20 shopping spree at the online Cheery Lynn Designs store

Thanks for joining me today!

Take care,

Live, Laugh & Create!

Saturday, November 1, 2014

Basic Tool Kit

Hello

I thought that I would re-post the basic tool kit needed for classes at Paper Arts Studio.

By each student having the required tools, it keeps classes run smoothly and on time!

Thank you & Take care,

Corina Finley

Live, Laugh & Create!

Required Basic Tools Checklist:

  • Paper Trimmer
  • Paper Piercer
  • Scissors
  • Brown Ink Pad and Black (for distressing)
  • Ink Blending Tool
  • Craft Mat
  • Bone Folder
  • Stylus
  • Score Board
  • Adhesive (all):

              Sookwang (double sided tape) 5mm,
              Liquid Glue (Glossy Accents),
              Pop Dots,
              Tape runner
              Glue Dots

Friday, October 31, 2014

Happy Halloween Card


Hello Everyone!

Happy Halloween! Corina here with you today, to share my Halloween Card.

I used the new Royal Scandinavian Doily. I inked the die cut purple and cut it in half. Adhered it on both the left and right side of the French Flair Classic Stacker die cut.

The best part of the new doily dies is that they are so versatile. Just change the colour to suit the occasion!


I used the horizon fishtail banner (my favorite as you know!) for my sentiment. I have to thank Nancy Hill (from a past Cheery Lynns Challenge 154 - Black and Orange) for the idea of the sentiment!


Dies used:

Horizon Fishtail Banners (3 Dies) - DL278


I hope you will play along in our weekly Cheery Lynn Designs Challenge 156 - Borders and Edgers. You could win a $20 shopping spree at the online Cheery Lynn Designs store

Thanks for joining me today!

Take care,

Live, Laugh & Create!

Friday, October 24, 2014

Army Card


Hello and Happy Friday!

Today I wanted to share my Army card that I created using some of the new Cheery Lynn Design Dies from the October 15th release!

Before I talk about the dies I used, I wanted to share a technique I used using the Gauze Border die as a stencil. 

I die cut the Gauze Border out of scrap paper. I then placed the border die cut on top of my Kraft card stock that I wanted to use on my card. I applied ink in a light colour (off white) direct to paper. Heat set and then moved the die/stencil slightly to the left and using my ink blending tool - I applied my green and brown ink tones. Remove my stencil and WOW! I absolutely love the effect it gave!


I used the New Army set - These dies are not just for the Armed forces but I will be using mine on masculine themed cards and on my scrapbook pages for my boys!


 Above is a Tank from the set which comes with four other dies. A helmet, the word Army which is shown above, a helicopter and Army Truck.


The I Spy die is going to be a great accent on nature cards. I live in Northern British Columbia, so outdoor/hunting activities are very popular here. I know that I will use this die quite a bit!

Dies Used

Gauze Border - B305

Sentiment Tag 2 (Set of 3) - B425

I hope you will play along in our weekly Challenge 155 - Vintage. You could win a $20 shopping spree at the online Cheery Lynn Designs store

Thanks for joining me today!

Take care,
Corina Finley

Live, Laugh & Create!

Friday, October 17, 2014

I DO Card!


Hello Everyone!

Did everyone check out the New Release over at the Cheery Lynn store. They are amazing, intricate, beautiful detailed dies.

If you have not checked them out - it is a must! Also owner of Cheery Lynn Designs - Mike, has created two video to describe and show you the versatility of this New Release.


Above is a close up of some wonderful detail from the dies. Love it!


I have layered my card using the Royal Scandinavian Doily (Set of 2) and the 

Madrid Flourishes Rectangle Boutique Stackers Frame. I have placed the couple - I Do in the center and covered them in a thin layer of micro fine black glitter. These three dies are from the new release. 


 Dies used:


Madrid Flourishes Rectangle Boutique Stackers Frame (Set of 3)


I hope you will play along in our weekly Challenge. You could WIN a $20 shopping spree at the online Cheery Lynn Designs store!

Thanks for joining me today!

Take care,
Corina Finley

Live, Laugh & Create!

Wednesday, October 15, 2014

Cheery Lynn Designs October 2014 New Release

Hello Everyone

I am here with you today to share the New Release dies from Cheery Lynn Designs! Wow, this release has some great images for you to die-cut. From Army to Bride & Groom, from Cowboy to conversation bubbles and you just have to check out the new Royal Scandinavian Doily die that I used.


The great thing about the New Doily and Frame dies is that they are compatible with the stacker dies. This makes layering quick and easy to do! I don't have the square stacker die but it will be on my next order guaranteed!


My Card is made with two dies - all the amazing detail with only 2 die-cuts! The small flourishes on top and bottom are pieces from the ROYAL SCANDINAVIAN die. I used the rhinestones to highlight the circle pattern in the Doily die shape. I stamped my saying and added the Wine & Grapes die-cut, which I think goes perfectly!

Dies used:

Royal Scandinavian Doily (Set of 2)

Wine & Grapes B494

I hope you will head over the the Cheery Lynn Designs Blog to see the other Design Team members wonderful creations. Also don't forget ti  check out the full New Release dies on the Cheery Lynn Designs website!

Thanks for joining me today!

Take care,
Corina Finley

Live, Laugh & Create!

Friday, October 10, 2014

Thanksgiving Card


Happy Thanksgiving Everyone!

I am celebrating Thanksgiving this weekend! The statutory Holiday of Thanksgiving in Canada is on the second Monday of October.

Also very importantly - it is my Birthday tomorrow! I plan to have the day filled with things I love - Family, Food, Crafting, and CAKE!


Here is a Flower close-up with the Wheat and Baby's Breath. I choose to use an orange colour palette for Fall and for a festive look.

I used the Mexican Tile and as I was using it, I kept thinking that the pattern reminded me of poinsettias. I will have to create another Copy-Cat Card closer to Christmas using the poinsettias!


 Dies used:


Shasta Daisy - B310


I hope you will play along in our weekly Challenge 153 - Halloween You could win a $20 shopping spree at the online Cheery Lynn Designs store!

Thanks for joining me today!

Take care,
Corina Finley

Live, Laugh & Create!